After having failed following the googled tutorial in HOpenGL programming, I thought I'd write down the steps I actually can get to work in a tutorial-like fashion. It may be a good idea to read this in parallell to the tutorial linked, since Panitz actually brings a lot of good explanations, even though his syntax isn't up to speed with the latest HOpenGL at all points.
Hello World
First of all, we'll want to load the OpenGL libraries, throw up a window, and generally get to grips with what needs to be done to get a program running at all.
import Graphics.Rendering.OpenGL
import Graphics.UI.GLUT

main = do
  (progname, _) <- getArgsAndInitialize
  createWindow "Hello World"
  mainLoop
However, as a skeleton, it is profoundly worthless. It doesn't even redraw the window, so we should definitely make sure to have a function that takes care of that in there somewhere. Telling the OpenGL-system what to do is done by using state variables, and these, in turn are handled by the datatype Data.IORef. So we modify our code to the following
import Graphics.Rendering.OpenGL
import Graphics.UI.GLUT

main = do
  (progname, _) <- getArgsAndInitialize
  createWindow "Hello World"
  displayCallback $= clear [ ColorBuffer ]
  mainLoop
This sets the global state variable carrying the callback function responsible for drawing the window to be the function that clears the color state. Save this to the HelloWorld.hs, recompile, and rerun. This program no longer carries the original pixels along, but rather clears everything out.
The displayCallback is a globally defined IORef, which can be accessed through a host of functions defined in Data.IORef. However, deep within the OpenGL code, there are a couple of definition providing the interface functions $= and get to fascilitate interactions with these. Thus we can do things like
height = newIORef 1.0
currentheight <- get height
height $= 1.5
Using the drawing canvas
So, we have a window, we have a display callback that clears the canvas. Don't we want more out of it? Sure we do. So let's draw some things.
import Graphics.Rendering.OpenGL
import Graphics.UI.GLUT

myPoints :: [(GLfloat,GLfloat,GLfloat)]
myPoints = map (\k -> (sin(2*pi*k/12),cos(2*pi*k/12),0.0)) [1..12]

main = do
  (progname, _) <- getArgsAndInitialize
  createWindow "Hello World"
  displayCallback $= display
  mainLoop

display = do
  clear [ColorBuffer]
  renderPrimitive Points $ mapM_ (\(x, y, z)->vertex$Vertex3 x y z) myPoints
  flush
Now, the important thing to notice in this codeextract is that last line. It starts a rendering definition, gives the type to be rendered, and then a sequence of function calls, each of which adds a vertex to the rendering canvas. The statement is basically equivalent to something along the lines of
renderPrimitive Points do
 vertex Vertex3 ...
 vertex Vertex3 ...

We can replace Points with other primitives, leading to the rendering of:
Triangles
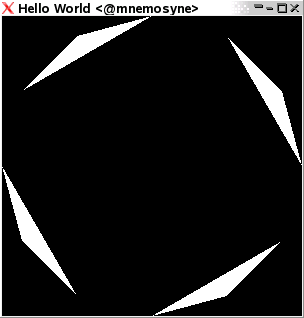
Triangle strips
Triangle fans
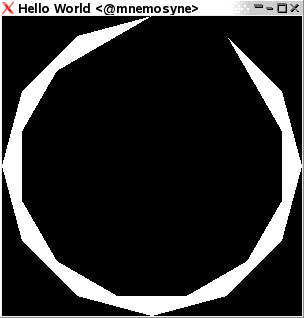
Lines

Line loops
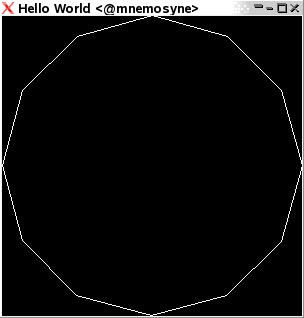
Line strips

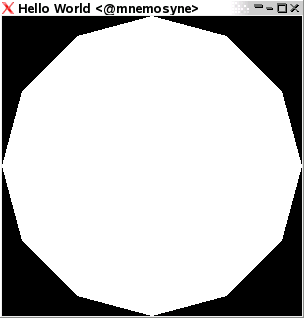
Quadrangles

Quadrangle strips

Polygon

There are more things we can do on our canvas than just spreading out coordinates. Within the command list constructed after a renderPrimitive, we can give several different commands that control what things are supposed to look like, so for instance we could use the following
display = do
  clear [ColorBuffer]
  renderPrimitive Quads $ do
    color $ (Color3 (1.0::GLfloat) 0 0)
    vertex $ (Vertex3 (0::GLfloat) 0 0)
    vertex $ (Vertex3 (0::GLfloat) 0.2 0)
    vertex $ (Vertex3 (0.2::GLfloat) 0.2 0)
    vertex $ (Vertex3 (0.2::GLfloat) 0 0)
    color $ (Color3 (0::GLfloat) 1 0)
    vertex $ (Vertex3 (0::GLfloat) 0 0)
    vertex $ (Vertex3 (0::GLfloat) (-0.2) 0)
    vertex $ (Vertex3 (0.2::GLfloat) (-0.2) 0)
    vertex $ (Vertex3 (0.2::GLfloat) 0 0)
    color $ (Color3 (0::GLfloat) 0 1)
    vertex $ (Vertex3 (0::GLfloat) 0 0)
    vertex $ (Vertex3 (0::GLfloat) (-0.2) 0)
    vertex $ (Vertex3 ((-0.2)::GLfloat) (-0.2) 0)
    vertex $ (Vertex3 ((-0.2)::GLfloat) 0 0)
    color $ (Color3 (1::GLfloat) 0 1)
    vertex $ (Vertex3 (0::GLfloat) 0 0)
    vertex $ (Vertex3 (0::GLfloat) 0.2 0)
    vertex $ (Vertex3 ((-0.2::GLfloat)) 0.2 0)
    vertex $ (Vertex3 ((-0.2::GLfloat)) 0 0)
  flush

Callbacks - how we react to changes
We have already seen one callback in action: displayCallBack. The Callbacks are state variables of the HOpenGL system, and are called in order to handle various things that may happen to the place the drawing canvas lives. For a first exercise, go resize the latest window you've used. Go on, do it now.
I bet it looked ugly, didn't it?
This is because we have no code handling what to do if the window should suddenly change. Handling this is done in a callback, residing in the IORef reshapeCallback. Similarily, repainting is done in displayCallback, keyboard and mouse input is in keyboardMouseCallback, and so on. We can refer to the HOpenGL documentation for window callbacks and for global callbacks. Window callbacks are things like display, keyboard and mouse, and reshape. Global callbacks deal with timing issues (for those snazzy animations) and the menu interface systems.
In order for a callback to possibly not be defined, most are typed within the Maybe monad, so by setting the state variable to Nothing, a callback can be disabled. Thus, setting callbacks is done using the keyword Just. We'll add a callback for reshaping the window to our neat code, changing the main function to
main = do
  (progname, _) <- getArgsAndInitialize
  createWindow "Hello World"
  displayCallback $= display
  reshapeCallback $= Just reshape
  mainLoop

reshape s@(Size w h) = do
  viewport $= (Position 0 0, s)
  postRedisplay Nothing
Here, the code for the reshape function resizes the viewport so that our drawing area contains the entire new window. After setting the new viewport, it also tells the windowing system that something has happened to the window, and that therefore, the display function should be called.
Summary
So, in conclusion, so far we can display a window, post basic callbacks to get the windowhandling to run smoothly, and draw in our window. Next installment of the tutorial will bring you 3d drawing, keyboard and mouse interactions, the incredible power of matrices and the ability to rotate 3d objects for your leisure. Possibly, we'll even look into animations.